Table of Contents
Introduction
Maintaining the integrity and comfort of your log cabin largely depends on the condition of your caulking. Proper sealing keeps your home dry and draft-free and protects the structure from costly repairs. When gaps appear, considering professional caulking replacement is essential to prolong the life of your log cabin and safeguard your investment.
Well-executed caulking creates an effective barrier against water, drafts, and pests. This is particularly important for log homes due to the timber’s natural movement and settling. When regular caulking maintenance is part of their upkeep routine, homeowners benefit from improved energy efficiency, fewer maintenance issues, and enhanced comfort.
As log cabins endure everything from heavy rain to temperature swings, taking proactive steps with your caulking strategy is vital. Not only will this help avoid major repairs, but it’s also key to maintaining your home’s rustic charm for years. Whether keeping an existing cabin or preparing a new one for long-term use, understanding best practices is crucial for success.
If you are new to log home care, these best practices can empower you to avoid common pitfalls and achieve consistently excellent results.
Importance of Caulking
Caulking is your log cabin’s primary defense against moisture and insects. Wood’s natural settling and aging can create small gaps, which, if left untreated, can allow water to seep in. This can cause rot, mildew, and even structural damage over time. Moreover, caulking helps create a weather-tight barrier that insulates your home, reducing strain on heating and cooling systems and lowering energy bills. According to House Digest, regular inspection and sealing logs are crucial to prevent long-term issues.
Choosing the Right Caulking Material
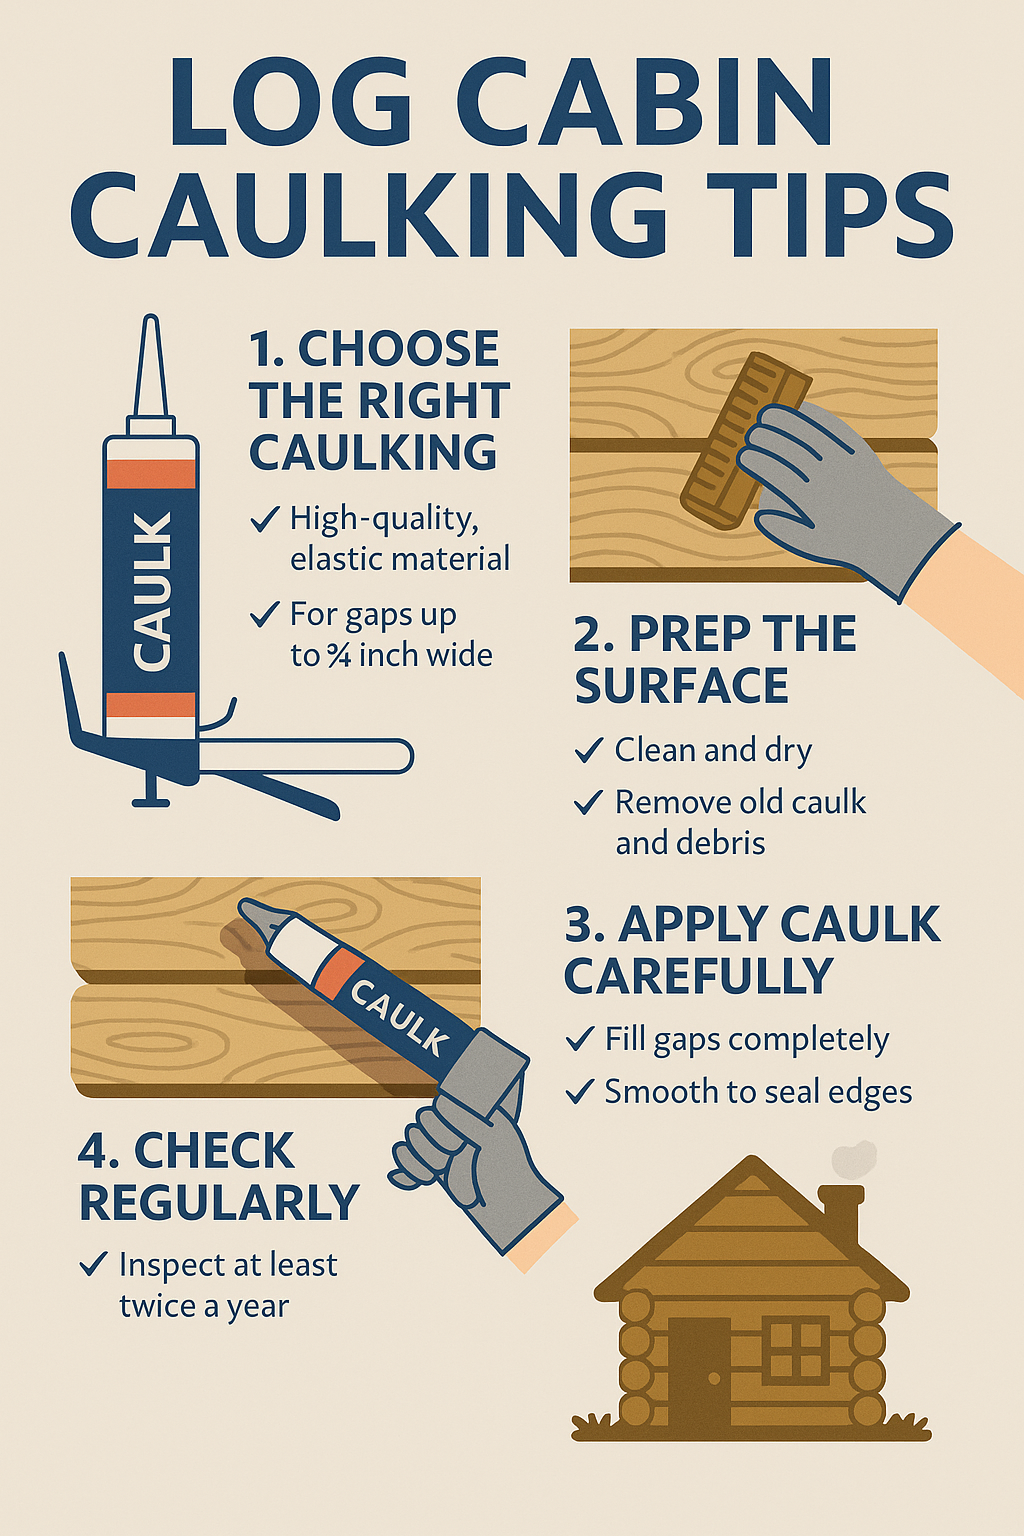
Not all caulking products are created equal. For log cabins, selecting materials specifically designed for wood is essential. For gaps up to ¾ inch, a high-quality, elastic caulk is recommended. These products expand and contract as your logs shift, ensuring they don’t crack or peel away. Chinking—a thicker, more robust material—should be used for larger voids. Brands like Sashco and Perma-Chink offer solutions tailored for log home preservation, providing the flexibility and durability these structures require. Review material data sheets to ensure compatibility and warranty coverage before starting your project.
Preparing the Surface
Thorough preparation is key to a long-lasting caulk job. Begin by clearing away all dust, dirt, old caulking, and debris. This can be accomplished using a gentle brush or, if needed, a pressure washer set to a low setting. Once clean, allow the logs to dry thoroughly; any trapped moisture can compromise adhesion. Don’t skip inspecting the logs for existing damage, rot, or insect infestation—address these issues before applying new caulk to prevent further deterioration. A well-prepped surface provides a sound base, helping your new caulking bond securely and last longer.
Application Techniques
Expert application makes all the difference in caulking performance. For deep or wide gaps, insert polyethylene backer rods to control the depth and provide a proper profile for the caulk. When applying, use a caulking gun to run an even bead along the joint, keeping steady, consistent pressure to fill gaps appropriately. Finish by tooling the bead—shape and smooth it with a caulk tool or your finger dampened with water. This step removes air pockets and ensures the caulk is well-seated against the wood for a professional appearance. For detailed guidance, refer to the Bob Vila Guide.
Weather Conditions and Timing
The timing of your caulking project is just as important as the materials and technique. The best results are achieved when temperatures are between 50°F and 80°F and humidity is moderate. Cold conditions can slow curing, while excessive heat may cause premature skinning or shrinking. Avoid applying caulk before rain or high humidity, as moisture can affect bonding. Always consult the manufacturer’s recommendations to ensure proper curing times.
Maintenance and Inspection
Continual inspection and touch-ups will keep your log cabin’s caulking in top condition. Inspect seams and joints at least twice yearly—ideally every spring and fall. Look for signs of cracking, shrinkage, or separation. Remove any defective caulk and reapply as necessary. Depending on sun, wind, or water exposure, reapplication intervals may vary, but high-quality caulks generally last 15 to 20 years. Prompt repairs help prevent minor issues from turning into costly disasters.
Common Mistakes to Avoid
- Wrong Caulking Type: Using standard household caulks on log homes leads to premature failure. Always select products engineered for logs’ flexibility and movement.
- Skipping Surface Prep: Applying caulk on dirty, damp, or damaged surfaces jeopardizes the bond and performance. Take the time to prep thoroughly.
- Poor Timing: Weather matters—avoid caulking in conditions below 50°F, above 80°F, or if rain is imminent.
Conclusion
Proper caulking is the cornerstone of lasting comfort, structural soundness, and energy efficiency in any log cabin. By selecting the right materials, preparing your surfaces, applying caulk with attention to detail, and performing routine inspections, you protect your investment and preserve your cabin’s rustic charm. Make caulking a regular part of your maintenance plan, and your log cabin will reward you with decades of durability and warmth.